How Jewelry Casting Works: The Complete Lost-Wax Process
The full casting pipeline from wax carving to finished gold piece. Every step, every material, every decision point explained by someone who has done it.
Every gold ring, every silver pendant, every platinum mounting you've ever seen in a jewelry store started the same way. As wax.
Lost-wax casting is the backbone of jewelry manufacturing. It's been around for 5,000+ years, and the core principle hasn't changed. You make a shape in wax. You surround it with plaster. You burn out the wax. You pour in metal. The metal fills the void where wax used to be.
Simple in theory. Absolutely unforgiving in practice.
What You Actually Need
Before anything else: equipment. A basic casting setup runs $2,000-8,000 depending on whether you're buying new or secondhand. Here's what you need at minimum:
- Vulcanizer (for making rubber molds from master patterns)
- Wax injector (shoots molten wax into rubber molds)
- Investment powder and a vacuum chamber (to mix and de-bubble the plaster)
- Burnout kiln (holds flasks at 1300°F for hours)
- Casting machine (centrifugal or vacuum)
- Crucible and torch (or an induction melter for serious production)
Rio Grande and Kerr are the two suppliers most workshops buy from. Rio sells complete starter kits. Kerr's investment powder (Satin Cast) is industry standard.
Step 1: The Wax Model
Everything starts with a wax model. This is either carved by hand (old school, still done for one-offs), injected from a rubber mold (standard production), or 3D printed in castable resin (the modern approach).
Hand carving takes skill. Green carving wax from Matt or Ferris comes in blocks, tubes, and sheets. You cut, file, and scrape it into shape using dental tools and wax burs. A skilled carver can produce a model in 2-4 hours. But nobody hand-carves production runs anymore.
For production: you make one perfect master model, create a rubber mold of it (that's what the vulcanizer does), then inject wax copies as fast as you need them. One mold can produce thousands of wax copies before it wears out.
And 3D printing? It's changed everything. A CAD designer builds the ring in MatrixGold or Rhino, sends it to a wax printer (Solidscape or Formlabs), and gets a perfect model with details no hand carver could match. Most manufacturing now uses this workflow.
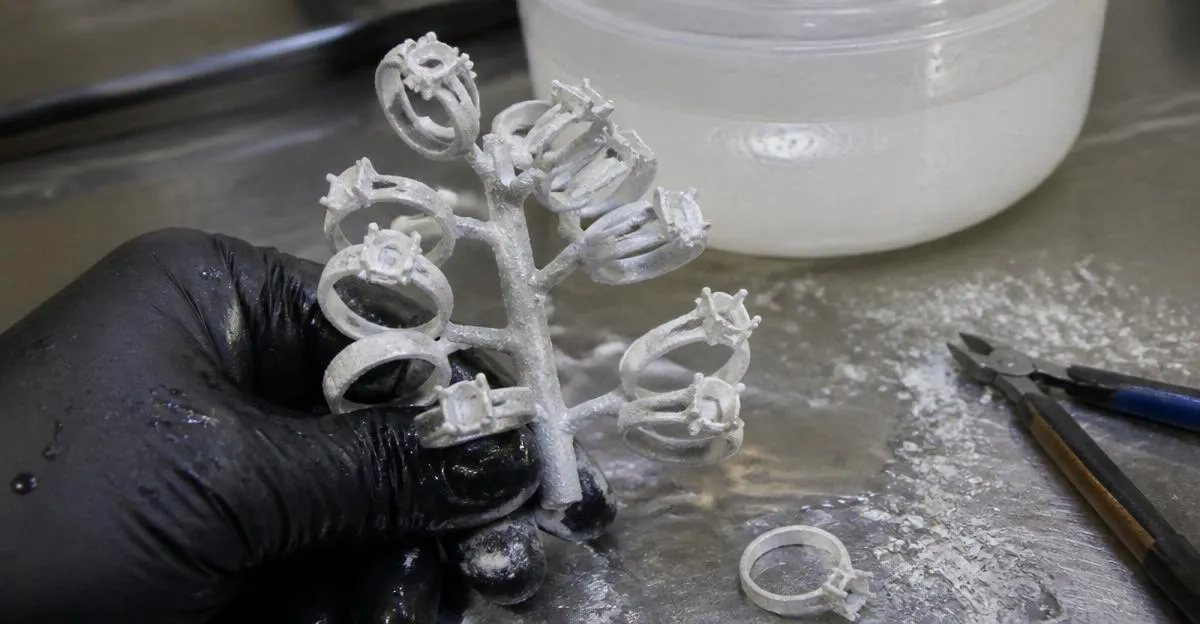
Step 2: Spruing and Tree Assembly
Individual wax models need to be attached to a central wax rod (the sprue). This creates channels for metal to flow in and gas to escape during casting.
Sprue placement matters more than people realize. Bad sprue placement causes:
- Porosity (tiny holes in the metal from trapped gas)
- Incomplete fill (metal solidifies before reaching extremities)
- Turbulence marks (rough spots where metal swirled instead of flowing smoothly)
The general rule: attach the sprue to the thickest part of the model. Metal flows from thick to thin. If you sprue at a thin point, the metal chills before reaching the thick sections and you get shrinkage porosity.
Multiple wax models get attached to a central wax trunk (called a "tree"). A single flask might hold 20-50 rings depending on size. This is how production shops cast efficiently.
Step 3: Investing
The wax tree goes inside a steel cylinder (the flask). Then you mix investment powder with water in specific ratios. Kerr Satin Cast 20 uses roughly 38-40ml of water per 100g of powder. Get the ratio wrong and you'll regret it.
Mix it, vacuum it (to remove air bubbles that would mar the surface), then pour it over the wax tree in the flask. The investment needs to set for at least 2 hours before you can burn it out.
One critical thing nobody mentions in tutorials: investment is exothermic. It heats up as it sets. If you're casting thin, delicate pieces, this heat can warp or partially melt your wax model before the investment fully hardens. Solution? Keep the flask in a cool water bath during setting.
Step 4: Burnout
This is where patience comes in. The flask goes into a kiln and follows a temperature ramp that takes 8-12 hours. You cannot rush this.
A typical burnout schedule:
- Room temp to 300°F over 2 hours (slow initial heating)
- Hold at 300°F for 2 hours (wax melts and drains out)
- 300°F to 1350°F over 3 hours (residual carbon burns away)
- Hold at 1350°F for 2-3 hours (flask is completely clean inside)
- Drop to casting temperature (900-1000°F for gold, varies by alloy)
If you rush the ramp, moisture in the investment turns to steam. Steam creates pressure. Pressure cracks the investment. Cracked investment means metal fills the cracks and you get fins on your casting that need grinding off. Or worse, the flask explodes.
Personally, I run burnout overnight. Load the kiln at 6pm, cast at 8am. Gives everything plenty of time.
Step 5: Casting
Two methods: centrifugal and vacuum.
Centrifugal casting uses a spring-wound arm. You heat the metal in a crucible at one end, release the arm, and centrifugal force throws the molten metal into the flask. Fast, aggressive, good for heavy pieces.
Vacuum casting pulls metal into the flask using negative pressure from below. Gentler fill, fewer turbulence issues, better for delicate filigree work. Most shops with budgets above $10K use vacuum.
The actual pour takes about 4 seconds. Four seconds, and 8+ hours of prep work either succeed or fail.
Gold melts at different temperatures depending on karat and alloy:
- 14K yellow: approximately 1615°F (879°C)
- 18K yellow: approximately 1700°F (927°C)
- Platinum: approximately 3220°F (1770°C), requires specialized equipment
You want the metal about 50-100°F above its melting point when you cast. Too cool and it won't fill. Too hot and you get surface reactions with the investment that pit the surface.
Step 6: Quenching and Devesting
After casting, you wait 5-15 minutes for the flask to cool enough that the metal solidifies but the investment is still warm. Then you quench the entire flask in a bucket of water.
The thermal shock shatters the investment. Most of it crumbles off immediately. Stubborn bits come off with a brass brush and water jet. For intricate pieces, an ultrasonic cleaner handles the details.
What you're left with: a tree of cast metal pieces still attached to their sprues.
Step 7: Finishing
Cut pieces off the tree with a jeweler's saw. Grind the sprue attachment point smooth. Then the real work begins: filing, sanding, pre-polishing, and final polishing.
A good casting reduces finishing time. A bad one? You spend more time cleaning up defects than you spent on the entire casting process.
Common defects and what causes them:
- Porosity (sponge-like surface): metal too hot, investment too wet, or bad sprue placement
- Incomplete fill: flask too cool, metal too cool, or insufficient force
- Surface pitting: investment breakdown at high temps (flask temperature too high during cast)
- Fins/flash: cracked investment from too-fast burnout ramp
Why This Matters
If you're buying jewelry, understanding casting tells you what to look for. Porosity, bad finish work, and visible casting defects are signs of cheap manufacturing. A well-cast piece should have smooth, uniform surfaces even before polishing.
If you're making jewelry, casting is where the economics live. Material cost is fixed by spot price. But a 40% casting failure rate doubles your effective material cost. Getting your process dialed takes time. Expect to ruin your first 10-20 flasks before things click.
And if you're running a jewelry business? Production casting (outsourcing to a casting house) costs $4-15 per piece depending on complexity. Knowing the process means you can evaluate quality and push back when something comes in wrong.
Where to Learn More
Our tools section has calculators for metal weight and pricing that tie directly into the casting process. The ring size converter helps when you're producing sized rings for inventory.
Next up in this series: setting stones after casting, and why most jewelers outsource that step.